First, the network monitoring common equipment
Network camera, hard disk recorder NVR (or ordinary PC plus client, suitable for ordinary users with desktop computers installed a small amount), switches (need to adjust according to the number of cameras and code rate, the supplier's recommendations can be used) hard disk, display , network cable, power sheath cable, power adapter (or 12V DC switching power supply), camera bracket, cable crystal head.
Second, the camera installation method
The front-end camera forwards and stores the captured video signal to the DVR in the background through the network cable and the switch while the power supply is running normally. There are differences in the specific connection methods for monitoring system points. For the specific connection diagram, see the third step below.
installation steps
Step 1: Determine the installation position and monitoring area of ​​the camera, and fix the camera to the building or monitoring pole through the camera bracket.
Step 2: Determine the placement of the background device (DVR and display), install the hard disk and place it on the DVR, and prepare the power strip for the background device.
Step 3: After the front and rear ends are completed, wiring is required (if the planning or plan is done in the early stage, this step is actually a priority, especially in the environment where the decoration is to be completed, the pipeline needs to be pre-buried), the line Divided into two parts: First, confirm the location of the switch, you need to connect each camera to the switch through the network cable, and also need to connect the network hard disk recorder (NVR) with the switch, in line with the principle of convenient routing, beautiful and safe. And make a crystal head at each end of each cable;
Secondly, the camera power supply line wiring, each camera needs a 12V / 1A or 2A power adapter, look at the construction environment or cost requirements, you can use a switching power supply instead (recommended a 12V/10A switching power supply do not bring more than 10 cameras , and so on), an additional power plug is required. as the picture shows:
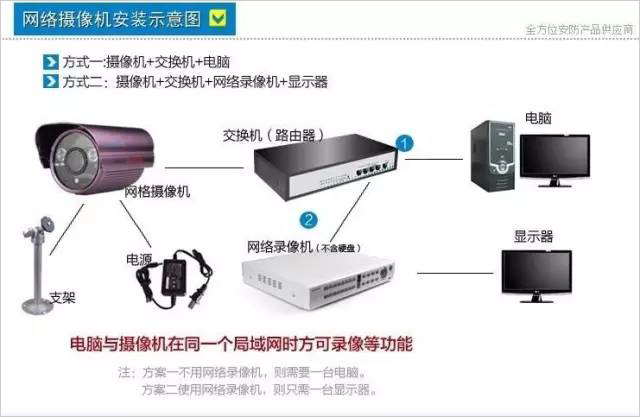
If the camera POE is powered, only one network cable needs to be laid, and a POE switch supplies power to the camera. as the picture shows:
In addition, depending on the number of points in the monitoring system, the connection method used is also different.
Architecture 1: 1-8 points of small engineering
For small projects with 1-8 points, you can directly use the ordinary 100M switch to achieve network environment construction. If 2 megapixel IPC is used, the code stream is calculated at 6 Mbps, 8 cameras occupy 8*6=48M, and the actual utilization rate of 100 Mbps switch is 50%-70%, that is, 50-70M, which can fully satisfy 8 IPCs. Transmission requirements.
Architecture 2: 9-50 points of small and medium-sized projects
For small and medium-sized projects with 9-50 points, it is not enough to use only 100-megabit switches. A higher-performance Layer 2 full-gigabit switch is needed for convergence to ensure smooth transmission of video information.
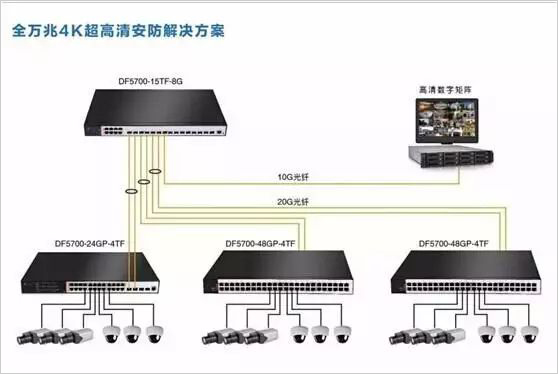
Architecture 3: Medium and large projects with more than 50 points
For medium and large projects with more than 50 points, a three-layer network architecture is required: the access layer, the aggregation layer, and the core layer.
Step 4: Debug the camera. After the installation is completed and all the lines are connected, the camera is powered on. The network settings must be made on the network hard disk recorder (NVR), and the network camera is added. (The configuration methods vary from manufacturer to manufacturer. ), after adding all the cameras, you will see the image, you can debug the camera angle, adjustable focus lens, etc. to the appropriate effect
Xue Ge suggested:
For a small number of front-end cameras, you can add a camera directly to the DVR, and let the camera automatically assign an IP address.
For the case of a large number of cameras, you must first write the camera address, then install and debug, and when adding a camera, it is recommended to add the WEB page directly, do not add it directly on the DVR.
Third, matters needing attention
The related settings of the network DVR, video recording, image color, etc. are all set manually, and can be operated according to the manual of the purchased device. Such a network monitoring system is completed.
For beginners, it is recommended that you do more hands-on, more operations, especially in the equipment commissioning, system commissioning phase, more participation, only theory plus practice, you can grow faster!
We Supply the original spare parts of Nanjing marine air compressor, including: Pistons, connecting rods, cylinder liner, piston, connecting rod, spindles, valves, springs, cooler, safe, glycerin tables, thermometers, electromagnetic valve, and all kinds of aprons, aluminum, copper pad.
Model: WP18L, WP25LW, P32L, WP60, WP110, WP185, WP 320,
Compressor parts for ships of: WP370 1-0.433/60, CZ-60/30, CZ-120/30. CZF-20.4/3-C, CZS-20.4-C, CWF-36/3, CWF-60/30, CZ-10/30FZK, H-6S, CZF-33, CVF-43, WF-0.6/3
We also offer a variety of spare parts of imported Marine Compressor of following model:
3L-10/8 3LE-10/8 VW-6/7 LW-6/12 (3)4L-20/8 LW-22/75L-40/85L-40/8-1 LW-42/7 (4) L3.5-20/8 LW-40/8 LW-20/10 LW-12/15Marine Air Compressor Spare Parts
Marine Spare Parts, Marine Air Compressors, Marine Air Compressor Spare Parts, Air Compressor Accessories, Marine Refrigeration Compressor Parts
Fuente International Co., Ltd. , http://www.shipssp.com